Quantcast
Channel: Troubleshooting – All about virtualization
Viewing all 80 articles
Browse latest View live

HPE ProLiant ML350 Gen9 BIOS P92 v2.30 introduces 2+2 Redundancy Power Supply Mode

$
0
0

The latest Service Pack for ProLiant (SPP) Version 2016.10.0 introduced an important BIOS Upgrade for ML350 Gen9 Server when using four power supplies.

With the older BIOS Version, the Redundant Power Supply Mode was configured per default for 3+1 Redundancy.

This means, that if you lose one out of four power supplies everything is still fine.
But a problem arises if you lose a second power supply. Because then the server shuts down immediately as the redundancy rule is violated.

A big problem, because server racks very often only have two separate power circuits. Losing the wrong power circuit will shut down your server if you run the 3+1 redundancy. Same problem with your UPS…

New with P92 v2.30: the 2+2 redundancy mode


But fortunately the new BIOS for ML350 Server (BIOS P92 version 2.30) allows you to choose between a 3+1 redundancy and a 2+2 redundancy mode:

  • Install the latest Service Pack SPP 2016.10.0

updates_spp

  • Press F9 during boot up in order to access your server BIOS
  • select “Advanced Options”

bios-advanced-options

  • select “Redundant Power Supply Mode” and choose between “Configured for 2+2 Redundancy” and “Configured for 3+1 Redundancy”

redundant-power-supply-mode

Der Beitrag HPE ProLiant ML350 Gen9 BIOS P92 v2.30 introduces 2+2 Redundancy Power Supply Mode erschien zuerst auf All about virtualization.


How to upgrade HPE Storevirtual VSA to version 12.6

$
0
0

This blog post is a step-by-step guide how to upgrade an existing HP StoreVirtual Infrastructure to LeftHand OS 12.6.

What’s new with version 12.6?

One enhancement of the latest version is, that you can now restart the upgrade without assistance from HPE Support if an upgrade fails (read more about this at the end of the blog post)

Beside some fixes and code improvements the following enhancements are worth to mention, too:

  • a new Network Diagnostic utility, which provides ping, traceroute and IPERF functions
  • createSnapshotSet and rollBackVolume action object modes were added to the REST API
  • the jumbo frame option as been re-enabled for StoreVirtual VSA’s
  • improvements, if a volume gets into the unrecoverable IO state (support has more/better possibilities now to help)
  • in case, that the retransmit rate exceeds 0,5% an event is now generated automatically
  • the minimum recurrence for snapshot schedules has been reduced from 30 minutes to 15 minutes


Before you begin:

Read the release notes carefully and check the following topics:

  • verify, that your StoreVirtual Version is supported for a direct upgrade (direct upgrades are supported from version 11.5, 12.0 and 12.5)
  • check the health of your VSA Infrastructure (are all managers running, is the quorum witness available,…?)
  • is your documentation up-to-date?
  • HPE recommends upgrading firmware before upgrading to v12.6 -> did you?
  • check all other dependancies as stated in the Release Notes (SRM, Hardware compatibility,…)


If you haven’t done it until now, you can configure your upgrade preferences here:

In the HPE StoreVirtual Centralized Management Console (CMC): Help – Preferences – Upgrades

VSA Upgrade 12.6

Then switch to the “Upgrades” tab where you get an overview about available upgrades for your infrastructure:

VSA Upgrade 12.6

1. Upgrade the Centralized Management Console (CMC)

The first step is the upgrade of the local installation of your CMC.

Click “Start Download” and wait until the download is completed. Then click “Continue…” to start the upgrade. At this time only the local installation of your CMC will be upgraded. The storage itself will not be touched in this step.

When the upgrade of the CMC is done you can perform the next step:

2. Upgrade of all Storage Systems in a Management Group


The next step is the invasive and exciting part of the upgrade. Once the upgrade has been started, it should not be terminated. It will upgrade the following components in one go:

  • all Storage Systems in the concerned Management Group
  • HPE StoreVirtual VSS Provider
  • HPE StoreVirtual DSM for MPIO
  • HPE StoreVirtual Command-Line Interface (CLI)

As in step 1, start the download of the binaries (click “start download”)

VSA Upgrade 12.6

Before you proceed with the upgrade, please verify again if the environment is healthy (all systems up and running, Quorum Witness available,…). When you are ready to upgrade, select “Continue…”

Read the warning message carefully. Select “OK” to start the upgrade or “Cancel” if you want to stop:

VSA Upgrade 12.6

Once the upgrade is started you can only lean back and wait.

Do not get nervous if nothing happens for some time – the installation will go on!

The upgrade process will take care of availability and performs the installation of the storage systems one after the other. Every successfully upgraded device will be marked with a green hook.

At the end you should see “100% Complete” and a green hook for every device:

VSA Upgrade 12.6

When all upgrades are done check the health of your VSA Infrastructure.


HPE VSA Upgrade failed, help!


For the unlikely event of a problem during the upgrade process, you have the possibility to abort the unfinished installations. Before you do this you should find out the reason and check the health of your environment. If you are not sure how to proceed, better open a support request at HPE.

In my case an upgrade failed as one of the patches could not be installed at the first try  for inexplicable reasons. I checked the storage systems twice and noticed that everything was up and running. There were no errors in the logs except the one with a failed patch installation. So I decided to abort the upgrade (87 percent were done at this time):

VSA Upgrade 12.6

As everything looked fine, I started the upgrade again. The missing patch was installed correctly anwizardizzard completed successfully.

Der Beitrag How to upgrade HPE Storevirtual VSA to version 12.6 erschien zuerst auf All about virtualization.

General report generation exception fault on real-time performance tab

$
0
0

A user with the permission to view the performance tab of a VM gets the following error when switching to the real-time view:

„General report generation exception“

General report generation exception

The user has no problems to view the data charts for eg. „past day“ or „past week“.

Resolution:


According to KB 2123566 „Cannot view advanced performance data charts in VMware vCenter Server 6.0“ you have to grant the user read-only permissions on the vCenter level to view the real-time performance charts, as the data is pulled from there.

This would allow the user to see the whole infrastructure.

Therefore you should take care not to propagate the permission to any child objects when setting this permission:

General report generation exception

In this way, the user can view the realtime performance charts without having read-only access to the whole infrastructure.

Der Beitrag General report generation exception fault on real-time performance tab erschien zuerst auf All about virtualization.

Lost connectivity to HP microSD Enterprise USB Kit

$
0
0

In this blog post MicroSD card RAID 1 as VMware ESXi boot device I wrote about the HP dual-microSD card module. This small piece of hardware provides data redundancy through a mirrored RAID 1 configuration and you can use it as an ESXi boot device.

Unfortunately, there seems to be a lot of problems with version 001 and 002 of the product. A lot of readers complained in the comments about issues, and I experienced some unexpected problems, too:

“Configuration Issues | Lost connectivity to the device […] backing the boot filesystem /vmfs/devices/disks/mpx … As a result, host configuration changes will not be saved to persistent storage.”

It seems, that in some situations the host experiences an all path down scenario and lost the connectivity to the SD card.

The good news: as ESXi runs in memory once it is started, there is no problem with production and the host keeps on running. If you want to get rid of the issue you just have to shut down the host and start it again. But this can only be a workaround.

Resolution:

If you experience the issue, too I recommend you to open a case with HP. There seems to be a problem with version 001 and 002 of the device. Version 003 should be working without problems.

The latest version has another design, so they are easy to distinguish. The version is imprinted on the stick, just search for the product number:

Der Beitrag Lost connectivity to HP microSD Enterprise USB Kit erschien zuerst auf All about virtualization.

HPE DL380 Gen9 “Starting drivers Please wait” after deploying BIOS P89 v2.40 (SPP 2017/04)

$
0
0

After deploying BIOS P89 v2.40 (02/17/2017) and/or ILO Firmware 2.50 (09/23/2016) an HP DL380 Gen9 Server stops during early BIOS boot sequence at the following message:

“Starting drivers. Please wait, this may take a few moments…”

HPE DL380 Gen9 starting drivers
Note: BIOS P89 v.2.40 is part of the HPE SPP from April 2017 (SPP 04/2017)

It seems, that there is a problem when you install BIOS B89 v2.40 in combination with the ILO Firmware v2.50. A possible workaround is to downgrade the ILO Firmware to Version 2.40.

Workaround:

  • download ILO Firmware v2.40 (1 Apr 2016) -> cp027575.exe
  • extract the content of cp027575.exe to C:\temp
  • connect to the ILO of the affected host
  • go to “Administration” – “Firmware”

FW ILO Upgrade HPE Server

  • select the file “ilo4_240.bin” from C:\temp

ILO4 2.40 BIN

  • click “Upload” to start the downgrade
  • Done!

When done, please check that you use the following combination: BIOS P89 v2.40 (02/17/2017) with ILO Firmware v2.40 (04/01/2016)

Der Beitrag HPE DL380 Gen9 “Starting drivers Please wait” after deploying BIOS P89 v2.40 (SPP 2017/04) erschien zuerst auf All about virtualization.

Virtual machine with OS Server 2008 R2 “Bootmgr is missing” error

$
0
0

A virtual machine with operating system 2008 R2 shows the following error during startup:

„BOOTMGR is missing Press Ctrl+Alt+Del to restart“

Bootmgr is missing

It is relatively easy to fix this error – here is a short how-to. This article was published about five years ago on my first blog written in German. But as I was in need of the solution today, I decided to quickly translate and repost it here (Olden but Golden if you need it…).

How to Fix “Bootmgr is missing”:


  • connect the OS installation disc (.iso) to the CDROM (if necessary change the boot options to boot from CD)
  • start the VM and boot into the OS setup
  • click “next” in the upcoming “Install Windows” wizard (Language)

  • In the next window select “Repair your Computer” to open the “System Recovery” Wizard

  • If your operating system is listed, select “next”. If no OS is listed, change the selection box to “Restore your computer using a system image that you created earlier”. It’s no problem if you do not have a system image. All that we want is to access a command prompt. And this is possible in the next window independent from the options above.

  • Select “Command Prompt” here:

  • Now we can fix the MBR error. Just use the following commands in the order specified below:

change to C: and execute:

BCDBOOT C:\Windows

BOOTREC /FIXMBR

BOOTREC /FIXBOOT

BOOTREC /REBUILDBCD

BOOTREC /SCANOS


  • Now type “Exit” to close the command prompt and reboot the server. It should boot now without any problems!

Der Beitrag Virtual machine with OS Server 2008 R2 “Bootmgr is missing” error erschien zuerst auf All about virtualization.

Active path information (I/O) is missing after patching an ESXi host

$
0
0

In the storage path Information window, you normally find a list looking like below. It shows “Active path” and “Active Path (I/O)”:

If you are missing the “Active path (I/O)” Information after patching/upgrading your ESXi hosts do not panic.

As described in VMware KB “Active path information (I/O) missing after update to 6.0 Update 3 (2149992)” this behavior is not normal, but only a cosmetic issue.

After patching: no more “Active (I/O)”

VMware KB lists the following symptoms for this issue:

  • The ESXi host has been updated to 6.0 Update 3.
  • This issue appears in the vSphere Client and vSphere Web Client.
  • Storage path information does not display which path is active (I/O).
  • Preferred path information is not seen using PSP Fixed.

Unfortunately, there is no workaround or resolution available for this issue at the moment.

Der Beitrag Active path information (I/O) is missing after patching an ESXi host erschien zuerst auf All about virtualization.

Cannot extend VMware datastore as available unused space is not listed

$
0
0

You want to extend a VMFS datastore using vCenter, but the available unused space on the datastore is not listed in the wizzard?

extend datastore vmware space not listed

extend datastore space not listed

The reason for this is that vCenter Server applies filters to prevent possible data corruption on LUNs used by other hosts. If you connect directly to the ESXi host you can extend the datastore as the filters do not exist there:

extend vmware dataspace vCenter

So if you are sure that you want to extend the datastore, connect to the ESXi host directly and extend the datastore from the GUI. Do not forget to rescan all hosts from vCenter Server afterwards.

You can learn more about storage filters here: VMware DOCs
Please note: it is not recommended to turn off device filters!

Der Beitrag Cannot extend VMware datastore as available unused space is not listed erschien zuerst auf All about virtualization.


HPE DL380 Gen9 “Starting drivers Please wait” (P89 BIOS v2.4x in combination with a MicroSD USB Kit)

$
0
0

Note:
This issue can have various causes – the following sources will help you:


Issue:

After deploying HPE SPP07/2017 or SPP04/2017 to an HP DL380 Gen9 Server with an installed HPE Dual 8GB MicroSD EM USB Kit you experience the following error:

The server stops during early BIOS boot sequence with Starting drivers. Please wait, this may take a few moments…”

HPE DL380 Gen9 starting drivers

It seems, that there is an incompatibility between BIOS B89 v2.40 (SPP04/2017) or BIOS B89 v2.42 (SPP07/2017) in combination with the HPE Dual 8GB MicroSD EM USB Kit Firmware Version 1.3.2.202.

Resolution is to update the firmware version of the HPE Dual 8GB MicroSD EM USB Kit to 1.3.2.212 (Downloadlink: CP032103)

How to upgrade:

  • Download the firmware -> cp032103.exe
  • extract the content of cp032103.exe to C:\temp
  • connect to your ESXi host via putty (login as root)
  • place the extracted files in a tmp directory
  • mark the .vmexe file as executable using the following command: chmod +x cp032103.vmexe
  • execute cp032103.vmexe using the command ./cp032103.vmexe
  • Follow the dialog (see the example in the screenshot below):

Now the Firmware Version of the USB Kit should be as follows:

Der Beitrag HPE DL380 Gen9 “Starting drivers Please wait” (P89 BIOS v2.4x in combination with a MicroSD USB Kit) erschien zuerst auf All about virtualization.

How to monitor eventlog for ReFS error ID 133

$
0
0

If you use ReFS for your Veeam repositories it makes sense to monitor the Windows Event Log for error ID 133 (“The file system detected a checksum error and was not able to correct it.  The name of the file or folder is…”).

ReFS feature Data Integrity Streams validates and maintains data integrity using checksums. In case of silent data corruption, it will generate the mentioned event log record.

Here is a simple solution how you can set up an alerting rule:

  • download blat.exe (command line utility that sends eMail using SMTP)
  • create a folder (eg. C:\temp\alert) on the server holding the ReFS repositories
  • copy blat.exe into the folder folder
  • create an alert.bat file with the following content:

C:\temp\alert\blat.exe -to <recipient> -server <your_smtp_server> -port 25 -f <sender_address> -subject “Attention, found Error ID 133 ReFS Data Corruption in Eventlog”

Next, open the Windows Task Scheduler and create a new task with the following settings:

General Tab:

  • Name: Alert Error 133
  • Security options: Change User or Group -> NT AUTHORITY\SYSTEM

Triggers Tab:

  • NEW… -> Begin the task “On an event”
  • Basic
  • Log: System
  • Event ID: 133
  • activate “Enabled”

edit trigger to monitor error ID 133 ReEF
Action Tab:

  • Action: “Start a program”
  • Program\script: specify the path to your alert.bat file

Check the other available options if useful for you and save the task.

How can I check if the alerting rule operates as expected?

You can generate a test event with ID 133 using the eventcreate command utility.

Open a command prompt and enter the following command:
eventcreate /l SYSTEM /t ERROR /so ReFS /id 133 /d “Testevent ID 133”
eventcreate to check ReFS for ID 133
Check the System event log and you will hopefully find the created test event ID 133:

test eventlog entry ReFS ID 133

When the monitoring task is working as expected you should find a mail with the alert in your inbox.

Der Beitrag How to monitor eventlog for ReFS error ID 133 erschien zuerst auf All about virtualization.

Veeam Extract Utility

$
0
0

In specific situations, you may need a possibility to access and restore VMs contained in backup files fast and easily. The Veeam Extract Utility enables you to manage this task even without any Veeam installation.

The only disadvantage of this tool is, that you can only recover VMs from a full backup file (.VBK). A restore from incremental backup files (.VIB/.VBR) is not possible.

How current the data in your available .vbk backup files is, depends on the used backup method. If you use for example Reverse Incremental, the latest available version is always a full one.

Quite different, when you use Forever Forward Incremental for your backups. With this backup method, the available .vbk file may contain really old data.

At the end of this post, you can find a brief overview of the different backup methods. It helps you to identify how the actuality of the available .vbk files can differ.

How to use the Extract Utility tool:

You can find the Extract Utility in the installation folder of Veeam Backup & Replication, by default: %PROGRAMFILES%\Veeam\Backup and Replication\Backup

If you have no access to the VBR installation anymore in case of a disaster, you can extract the files from the Veeam installation media .ISO file:

Extract the following files out of the VBR_SRV.CAB:

  • extract
  • extract.exe
  • veeam.backup.extractor.exe1 -> rename this file to veeam.backup.extractor.exe (without the “1”)

Step-by-step guide:

  • double-click “veeam.backup.extractor.exe” to start the tool
  • specify the path to the .VBK file of the VM you want to extract

Veeam Disaster Recovery Extract Utility

  • specify a folder to which the files must be extracted (Extract folder)
  • in the “virtual machines” section select the VMs you want to extract

Extract Utility Veeam

  • click “Extract” to start

When finished you can find the extracted virtual machine files in the path specified (Extract folder).

Copy the files to your storage/local disks and add the virtual machine to your inventory. After that, you can power-on the virtual machines as usual.

Backup methods vs. actuality of full backup file (.vbk)

This brief overview of the different backup methods should help you to identify the actuality of full backup (.vbk) files.

forever forward incrementalForever Forward Incremental:

  • full recovery files (.VBK)
  • incremental backup files (.VIB)

forward incremental backup


Forward Incremental Backup:

  • full recovery files (.VBK)
  • incremental backup files (.VIB)


reverse incremental backupReverse Incremental Backup:

  • full recovery files (.VBK)
  • reverse incremental change files (.VBR)


Der Beitrag Veeam Extract Utility erschien zuerst auf All about virtualization.

Consideration: All systems down! Recover your Veeam Backup & Replication server

$
0
0

In this short thought experiment, I try to outline possible first steps how you can recover from a disaster described as follows. It is partly based on a real-world scenario I was told about at a VMUG meeting.

Suppose you lose your whole VMware environment due to an HBA going mad.

It arbitrary overwrites files on your VMFS LUNs and destroys all virtual machines. Your critical infrastructure as Domain Controller, application server, database server and even your Veeam Backup & Replication server are down…

In the worst case, you have no idea which host is causing the failure and you have to install some VMware hosts from scratch on replacement hardware, too.
All that remains are the Veeam repositories with the backup files. By the way, this can also happen in a similar way due to a ransomware attack…

Do you have a plan for a scenario like this?

There are various ways to recover your Veeam B&R server and production, depending on the available resources (staff, replacement hardware, time, backup data center…) and technologies (eg. Instant Recovery).

Some possibilities are sketched in the following consideration.

Let’s take a look at the environment when everything is working as expected:

Disaster Recovery consideration example

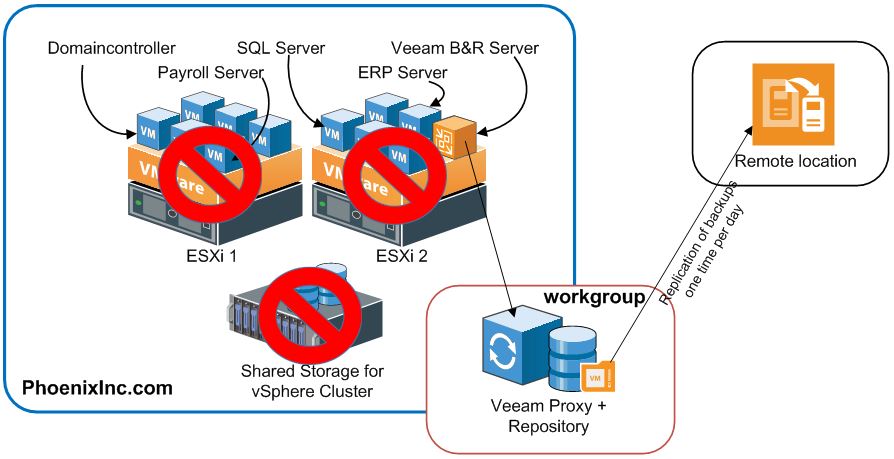
All servers of our sample company  Phoenix Inc. are virtualized running on a small VMware vSphere Cluster. Some VMs are providing infrastructure services like AD, DNS and DHCP.  Others are hosting database services and applications.

The Veeam Backup & Replication server is virtualized, too writing the backups to a physical repository server with local disk storage. For disaster recovery, all backups are replicated to a remote location.

This is a setup that you can find in many SMB sized companies…

The fun begins, when the picture changes to something like this…

Disaster Recovery all down

Let’s stick to the failure scenario described in the beginning of this blog post.

An HBA in one of the VMware hosts went mad due to a (fortunately rare) failure situation and wiped-out all your VMFS datastores. As a consequence, all VMs are destroyed and nobody can work anymore, as critical services as Active Directory and DNS are down, too.

Unfortunately, there is no chance to use magic features like Veeam’s Instant Recovery, as the Veeam B&R Server is among the victims.

So it is time to draw up a plan how to bring the systems up and running as fast as possible…

The next moves should be…

  • install VMware vSphere ESXi on a new hardware and provide access to storage (shared storage or local disks)
  • Recover your Veeam B&R server
  • bring back the most important infrastructure services like Active Directory, DNS and DHCP asap
  • restore all other VMs depending on their RTO (recovery time objective) classification

The first task should be realized relatively easily, provided that there is replacement hardware available. All you need is a hypervisor with access to local storage/shared storage, where you can restore your VMs and a network connection.

Task two is definitely a bigger challenge. Typically you are used to relying on the Veeam Console to restore VMs, databases, and files…

Ways to restore a Veeam B&R Server:

(p) is valid for a physical installation (v) for a virtual installation

Depending on your design/DR preparations you can choose between the following possibilities to restore your Veeam B&R Server:

Replication of the VBR Server to a remote location is in place? (v)

  • Start replica in the remote location manually (no need to reinstall Veeam B&R)

Veeam Server Configuration Backup is available? (v) (p)

Veeam backup files of your Veeam B&R Server are available (.vbk file) (v)

Absolutely no Veeam B&R server backups are available

No panic! You still have some possibilities left to survive:

  • (v)(p) Install a new Veeam B&R Server from scratch and import the backups files from the surviving repositories.  Without any backup of your Veeam server you have of course lost all your settings and configurations. This is annoying, but you can fix it after you have handled the disaster. For now, you can restore your production!
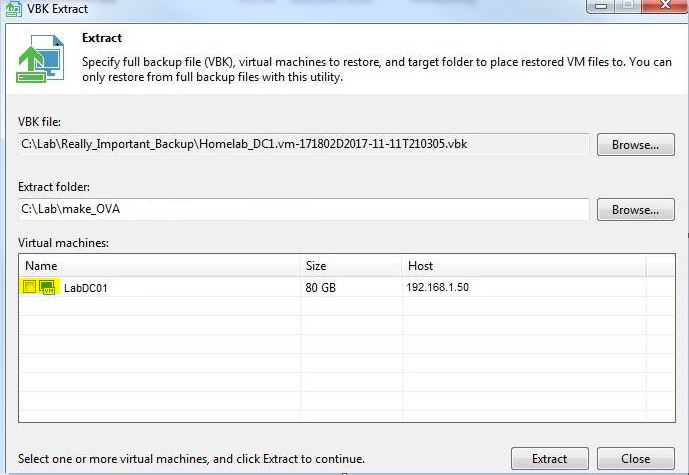
  • (v) Use the Extract Utility to restore VMs without having a Veeam Installation in place and re-add them to your VMware inventory. (Veeam Extract Utility)

After a successful recovery of your Veeam B&R environment, you can start to restore your VMs depending on their RTO (recovery time objective) classification.

And soon our sample company looks again like this (hopefully): 🙂

Disaster Recovery consideration example

Short and Sweet

There are numerous possibilities to recover a Veeam Backup and Replication Server after a disaster. And as long as you have functional, current backup files available, you can even restore them without any Veeam installation.

Nevertheless, it is necessary to prepare for the different disaster scenarios and test the recovery procedures regularly.

“By failing to prepare, you are preparing to fail” (Benjamin Franklin)

Do you have better/more/other suggestions to handle this disaster? Is something wrong? Just leave a comment!

Der Beitrag Consideration: All systems down! Recover your Veeam Backup & Replication server erschien zuerst auf All about virtualization.

Active Directory Query: list locked user accounts

$
0
0

Are you looking for a quick and easy way to find all locked user accounts?

You can reach this goal with an Active Directory Query. Just follow this short step-by-step guide:

Active Directory Query: list locked user accounts

  • connect to a Domain Controller
  • open Active Directory Users & Computers
  • right-click “Saved Queries” -> New -> Query
  • provide a name for your query

Query locked user accounts active directory

  • select “Define Query…”
  • change to “Advanced” and enter the following LDAP query:

(&(&(&(objectCategory=Person)(objectClass=User)(lockoutTime>=1))))

Query find all locked user accounts in active directory

  • press OK and close the “Edit Query” window

All locked users should now be listed in the right window!

Der Beitrag Active Directory Query: list locked user accounts erschien zuerst auf All about virtualization.

Useful scripts to upgrade the virtual hardware of VMs from a list

$
0
0

If you plan to upgrade the virtual hardware (vHW) of a large number of virtual machines from a list, the following PowerCLI scripts may be useful for you.

All code-snippets are processing the virtual machines listed in a text file „C:\temp\vmliste.txt“

The scripts will help you to perform the following actions:

  • shutdown all VMs from the list
  • upgrade the virtual Hardware to the desired version (eg. 11)
  • power-on all VMs from the list

Part 1 – Shutdown all VMs from the list „C:\temp\vmliste.txt“


foreach($vmlist in (Get-Content -Path C:\TEMP\vmliste.txt)){
$vm = Get-VM -Name $vmlist
Set-VM -VM $vm -Version v11 -Confirm:$false
}

Part 2 – Upgrade the vHW to the desired version (eg. 11):


foreach($vmlist in (Get-Content -Path C:\TEMP\vmliste.txt)){
$vm = Get-VM -Name $vmlist
Set-VM -VM $vm -Version v11 -Confirm:$false
}

Part 1 – Start all VMs from the list „C:\temp\vmliste.txt“


foreach($vmlist in (Get-Content -Path C:\TEMP\vmliste.txt)){
$vm = Get-VM -Name $vmlist
Start-VM -VM $vm -Confirm:$false
}

Der Beitrag Useful scripts to upgrade the virtual hardware of VMs from a list erschien zuerst auf All about virtualization.

How to forcibly stop a dedicated Veeam job stuck in „stopping“ status

$
0
0

It may happen that a Veeam Backup Job stucks in “stopping” status.  If you search for a resolution you will stumble upon Veeam KB 1727.

Unfortunately, the provided solution will terminate ALL jobs and restores.

But how do you terminate a dedicated Veeam job stuck in “stopping” status?

Before you start please note:
Some jobs may take some time to stop, please allow up to 60 minutes for a job to stop before terminating it.

How to terminate a dedicated job:

First, find out the ID of the job you want to terminate:

  • right-click the job in your „Veeam Backup and Replication Console“ and select „Edit“
  • change to „Summary“
  • write down the ID mentioned in the command line to start the job on the backup server:

terminate dedicated veeam job stuck in stopping state

  • open the Task Manager on your Veeam Backup & Replication Server
  • change to „Processes“
  • right-click in the header of the processes and select „Command Line“ to be displayed
  • search for the command line with the ID worked out the step before
  • right-click the said command line and select „End Task“ to terminate the process:

terminate dedicated veeam job stuck in stopping status

  • Done!

Der Beitrag How to forcibly stop a dedicated Veeam job stuck in „stopping“ status erschien zuerst auf All about virtualization.


HPE ProLiant Server End of Service Life (EOSL) and Retired Matrix

$
0
0

As far as I know, HPE is not offering any publicly available lifecycle matrix for their HPE ProLiant Server family.

Lifecycle Matrix HPE Server ProliantSo I have tried to put together the “Retired” and “End of Service Life” dates for HPE ProLiant G6 – Gen10 Servers in the following lifecycle matrix.

Source of information were various threads in forums (eg. HPE community forum) and input from HPE representatives/Support.

HPE ProLiant G6 Server Family

ServerRetired (=End of Sale)End of Service Life (EOSL)
BL2x220c G630/04/201130/04/2016
BL460c G630/06/201130/06/2016
BL465c G631/12/201031/12/2015
BL490c G631/03/201131/03/2016
BL685c G631/03/201131/03/2016
DL120 G601/02/200801/02/2013
DL160 G628/02/201328/02/2018
DL165 G601/03/201001/03/2015
DL180 G628/02/201328/02/2018
DL320 G601/06/200801/06/2012
DL360 G609/07/201109/07/2016
DL380 G630/04/201130/04/2016
DL385 G631/12/201031/12/2015
DL585 G6??

HPE ProLiant G7 Server Family

ServerRetired (=End of Sale)End of Service Life (EOSL)
BL2x220c G731/10/201231/10/2017
BL460c G728/02/201328/02/2018
BL465c G731/12/201231/12/2017
BL490c G731/12/201231/12/2017
BL620c G731/03/201131/03/2016
BL680c G731/03/201131/03/2016
BL685c G725/10/201625/10/2021
DL120 G701/02/200801/02/2013
DL165 G701/03/201001/03/2015
DL360 G730/04/201330/04/2018
DL380 G730/04/201330/04/2018
DL385 G730/04/201330/04/2018
DL580 G716/08/201616/08/2021
DL585 G7??
DL980 G7??
ML110 G730/07/201330/07/2018

HPE ProLiant Gen8 Server Family

ServerRetired (=End of Sale)End of Service Life (EOSL)
BL240C Gen8??
BL420c Gen818/11/201618/11/2021
BL460C Gen802/08/201602/08/2021
BL465C Gen818/11/201618/11/2021
BL660C Gen8??
WS460C Gen8??
DL320e Gen8 V116/08/201616/08/2021
DL320e Gen8 v231/10/201631/10/2021
DL360e Gen816/08/201616/08/2021
DL360p Gen813/06/201613/06/2021
DL380e Gen816/08/201616/08/2021
DL380p Gen813/06/201613/06/2021
DL385p Gen8??
DL460 Gen8??
DL560 Gen8??
DL580 Gen830/09/201630/09/2021
ML10 Gen8??
ML310e Gen8 V1??
ML310e Gen8 V2??
ML350e Gen8 V1??
ML350e Gen8 V217/08/201617/08/2021
ML350p Gen817/08/201617/08/2021
Microserver??
SL250s Gen8??
SL270s Gen8??
SL4540 Gen8??

HPE ProLiant Gen9 Server Family

ServerRetired (=End of Sale)End of Service Life (EOSL)
BL420c Gen9-
BL460c Gen9-
BL465c Gen9-
BL660c Gen9-
DL20 Gen9-
DL60 Gen9-
DL80 Gen9-
DL120 Gen9-
DL160 Gen9-
DL180 Gen9-
DL360 Gen9-
DL380 Gen9-
DL560 Gen9-
DL580 Gen9-
ML10 Gen9-
ML30 Gen9-
ML110 Gen9-
ML150 Gen9-
ML350 Gen9-

HPE ProLiant Gen10 Server Family

ServerRetired (=End of Sale)End of Service Life (EOSL)
DL385 Gen10current version
DL580 Gen10current version
DL560 Gen10current version
DL380 Gen10current version
DL360 Gen10current version
ML110 Gen10current version
ML350 Gen10current version
Microserver Gen10current version

If you can provide missing details please leave a comment or ping me on Twitter (@lessi001). As I was not able to prove every single dataset there may also be an error in the table. If you find one, please let me know.

Der Beitrag HPE ProLiant Server End of Service Life (EOSL) and Retired Matrix erschien zuerst auf All about virtualization.

Error: The destination host is not compatible with the hardware version to which the VM is scheduled to be upgraded

$
0
0

I scheduled a large number of VMs (find the script here) to upgrade the virtual hardware to the latest version.

Unfortunately, one VM ran into an issue and it was not possible to perform a vMotion or power it on anymore.

Every vMotion or Power-on actions failed with the following general system error:

A general system error occurred:

The destination host is not compatible with the hardware version to which the VM is scheduled to be upgraded. In order to proceed with the operation, VM’s scheduled compatibility upgrade should be disabled.

The hardware version displayed in the vSphere Web client was vHW 11. Everything looked fine, no VM Compatibility Upgrade was scheduled. So I tried to remove the VM from inventory and re-add it, but the error persisted.

Resolution:

It was necessary to delete three lines in the .vmx file:

  • power off the VM (if it is still running…)
  • remove the VM from inventory
  • make a copy of the .vmx file of affected VM (backup is always a good idea)
  • open the .vmx file in an editor and delete the following three lines:

tools.upgrade.policy = “upgradeAtPowerCycle”
virtualHW.scheduledUpgrade.when = “always”
virtualHW.scheduledUpgrade.state = “done”

  • add the VM to inventory
  • power-on the VM
  • check if the error persists

Note:
“Check and upgrade Tools during power cycling” is not active any more. You have to re-enable this setting if necessary (VM Settings – Edit Settings – VM Options – Tools Upgrade)

If the VM was part of a DRS rule you have to take care that you re-add it if necessary.

Der Beitrag Error: The destination host is not compatible with the hardware version to which the VM is scheduled to be upgraded erschien zuerst auf All about virtualization.

VMware VCSA error: 503 Service Unavailable Failed to connect to endpoint

$
0
0

Today I struggled with the following error when trying to login to my VMware VCSA:

503 Service Unavailable Failed to connect to endpoint:
[N7Vmacore4Http20NamedPipeServiceSpecE:0x00007f975808ee30]

It took me some time to bring it back to life – maybe this short summary can help you:

  • create a snapshot of your VCSA (backup is your friend…)
  • connect to your VCSA console and press Alt + F1
503 Service Unavailable
  • login with your root account
  • type “shell”
  • type “cd ..”
  • enter the following command to access the postgres database:
    /opt/vmware/vpostgres/current/bin/psql -U postgres -d VCDB
  • reindex the following tables with the commands below:

reindex pk_fle_snap_disk_unit

reindex vpx_vm_fle_snap_disk_unit_m1

503 Service Unavailable

Restart the VCSA and wait some time until it is successfully bootet. If you can log-on without any issue do not forget to delete the snapshot.

Der Beitrag VMware VCSA error: 503 Service Unavailable Failed to connect to endpoint erschien zuerst auf All about virtualization.

How to remove invalid VMs from vSphere webclient

$
0
0

Because of removing storage devices in my homelab for DR tests, some VMs became “invalid” in the vSphere webclient. A remove/delete of these VMs was not possible as all options were greyed out.

remove invalid vm from webclient

The resolution for me was to select a second VM (one that is powered-on). Doing so the context menue will offer an “unregister” option.

As a powered-on VM cannot be unregistered by design, the action will only be executed for the invalid VM:

remove invalid vm from webclient vmware esxi

Der Beitrag How to remove invalid VMs from vSphere webclient erschien zuerst auf All about virtualization.

Veeam Backup for O365: failed to export item to .pst file

$
0
0

Short blog post as this error was tricky and costs some time…

Veeam Backup for O365 allows the export of selected items to a .pst file.

Usually this works like a charm. But recenty the export always stopped at 100 percent and the following error was displayed in the job status:

Failed to export item Veeam website registration completed (type: IPM.Note; source: … )

Resolution:

The reason for this behaviour was a registry key set by the domain admins:

HKEY_CURRENT_USER\Software\Policies\Microsoft\office\16.0\outlook\PST

PstDisbaleGrow = 1

This registry key is used to prevent users from adding new content to existing PST files.

It’s often used in combination with DisablePST = 1 to prevent users from adding PSTs to Outlook profiles and/or prevent using Sharing-Exclusive PSTs.

The resolution is to set this registry key to “0” at the affected system.

Der Beitrag Veeam Backup for O365: failed to export item to .pst file erschien zuerst auf All about virtualization.

Viewing all 80 articles
Browse latest View live


<script src="https://jsc.adskeeper.com/r/s/rssing.com.1596347.js" async> </script>